


收益
- 不用再通过命令行发布
- 发布环境稳定,可以重复执行
- 发布过程中不需要输入密码
准备
- linux服务器已安装jenkins、git、openjdk8和maven3.5+已就绪
- git服务
- 一个已经能够发布jar文件至Maven中央仓库的项目
jenkins和git服务可参考树莓派4B基于docker搭建devops平台进行准备,如何发布jar文件至Maven中央仓库可参考将 JAR 发布到中央 Maven 仓库。
本实践环境中使用的jenkins就是参考树莓派4B基于docker搭建devops平台进行搭建的,参考文档中使用的jenkins镜像已经内置git、openjdk8和maven3.8.4,且同时支持树莓派和普通x86服务器;sdkg是一个已经准备好的可发布jar文件至Maven中央仓库的项目,如您也准备好了一个能够发布jar文件至Maven中央仓库的项目,可以将它 push到搭建好的git服务器,如gogs;或者任何可选的代码托管平台,如github、gitee、codeup、coding等等。
pipeline设计与实现
步骤
- 下载源码
- 编译并发布jar文件至Maven中央仓库
脚本
node {
    stage('git chekout') {
        git branch: "master", url: 'https://gitee.com/fastjrun/sdkg.git'
    }
    stage('mvn deploy') {
        sh 'sh build.sh publish_plugin'
    }
}
build.sh
#!/bin/bash

echo "build ..."
if [ "local_plugin" = $1 ] ; then
  mvn clean install -pl sdkg-plugin,base-sdkg/base-sdkg-client,base-sdkg/base-sdkg-provider,base-sdkg/base-sdkg-sb2-test,base-sdkg/example-sdkg/example-sdkg-client,base-sdkg/example-sdkg/example-sdkg-provider,base-sdkg/example-sdkg/example-sdkg-generator,base-sdkg/eladmin-sdkg/eladmin-sdkg-client,base-sdkg/eladmin-sdkg/eladmin-sdkg-provider,base-sdkg/eladmin-sdkg/eladmin-sdkg-generator -am
elif [ "publish_plugin" = $1 ] ; then
  mvn clean deploy -Prelease -pl sdkg-plugin,base-sdkg/base-sdkg-client,base-sdkg/base-sdkg-provider,base-sdkg/base-sdkg-sb2-test,base-sdkg/example-sdkg/example-sdkg-client,base-sdkg/example-sdkg/example-sdkg-provider,base-sdkg/example-sdkg/example-sdkg-generator,base-sdkg/eladmin-sdkg/eladmin-sdkg-client,base-sdkg/eladmin-sdkg/eladmin-sdkg-provider,base-sdkg/eladmin-sdkg/eladmin-sdkg-generator -am
elif [ "package_example" = $1 ] ; then
  mvn compile -pl base-sdkg/example-sdkg/example-codeg/example-api -am -Dapigc.skip=false
  mvn compile -pl base-sdkg/example-sdkg/example-codeg/example-bundle -am -Dbdgc.skip=false
  mvn compile -pl base-sdkg/example-sdkg/example-codeg/example-bundle-mock -am -Dbdmgc.skip=false
  mvn compile -pl base-sdkg/example-sdkg/example-codeg/example-client -am -Dclientgc.skip=false
  mvn package -pl base-sdkg/example-sdkg/example-codeg/example-api,base-sdkg/example-sdkg/example-codeg/example-bundle,base-sdkg/example-sdkg/example-codeg/example-bundle-mock,base-sdkg/example-sdkg/example-codeg/example-client -am
elif [ "package_eladmin" = $1 ] ; then
  mvn compile -pl base-sdkg/eladmin-sdkg/eladmin-codeg/eladmin-api -am -Dapigc.skip=false
  mvn compile -pl base-sdkg/eladmin-sdkg/eladmin-codeg/eladmin-bundle -am -Dbdgc.skip=false
  mvn compile -pl base-sdkg/eladmin-sdkg/eladmin-codeg/eladmin-bundle-mock -am -Dbdmgc.skip=false
  mvn compile -pl base-sdkg/eladmin-sdkg/eladmin-codeg/eladmin-client -am -Dclientgc.skip=false
  mvn package -pl base-sdkg/eladmin-sdkg/eladmin-codeg/eladmin-api,base-sdkg/eladmin-sdkg/eladmin-codeg/eladmin-bundle,base-sdkg/eladmin-sdkg/eladmin-codeg/eladmin-bundle-mock,base-sdkg/eladmin-sdkg/eladmin-codeg/eladmin-client -am
fi
echo "build done."
pipeline执行
配置任务
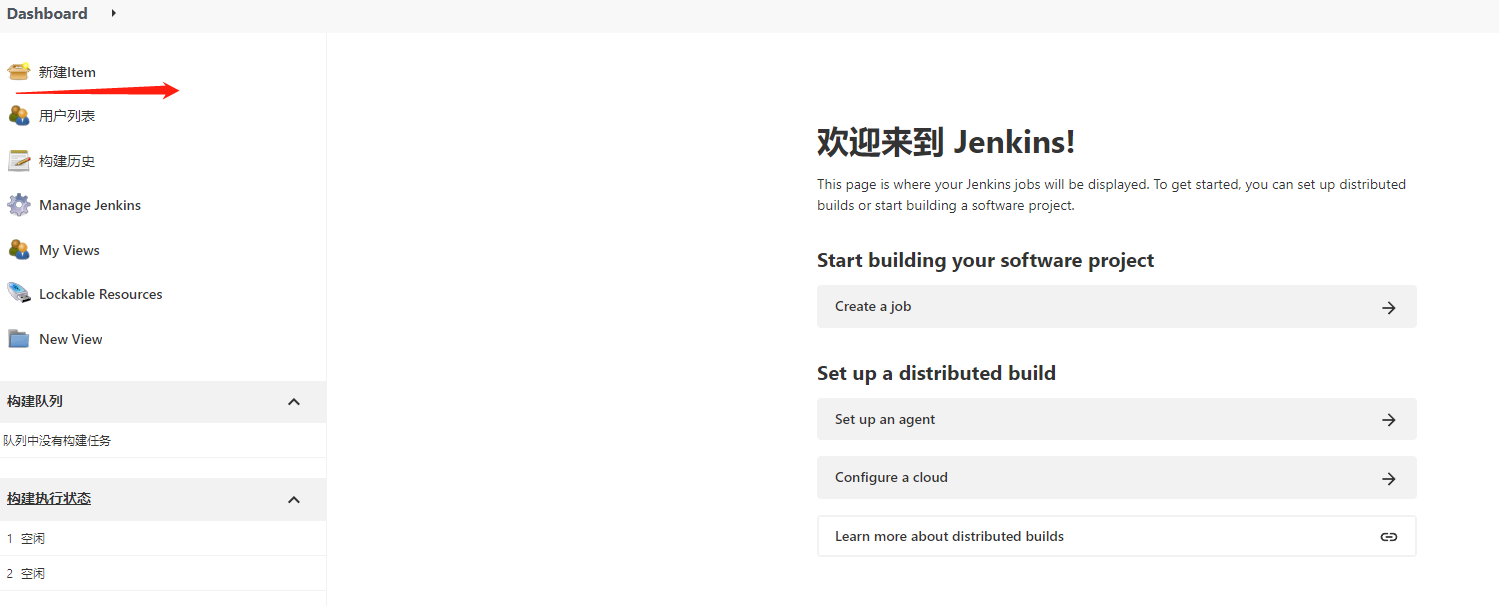
jenkins控制台新建item
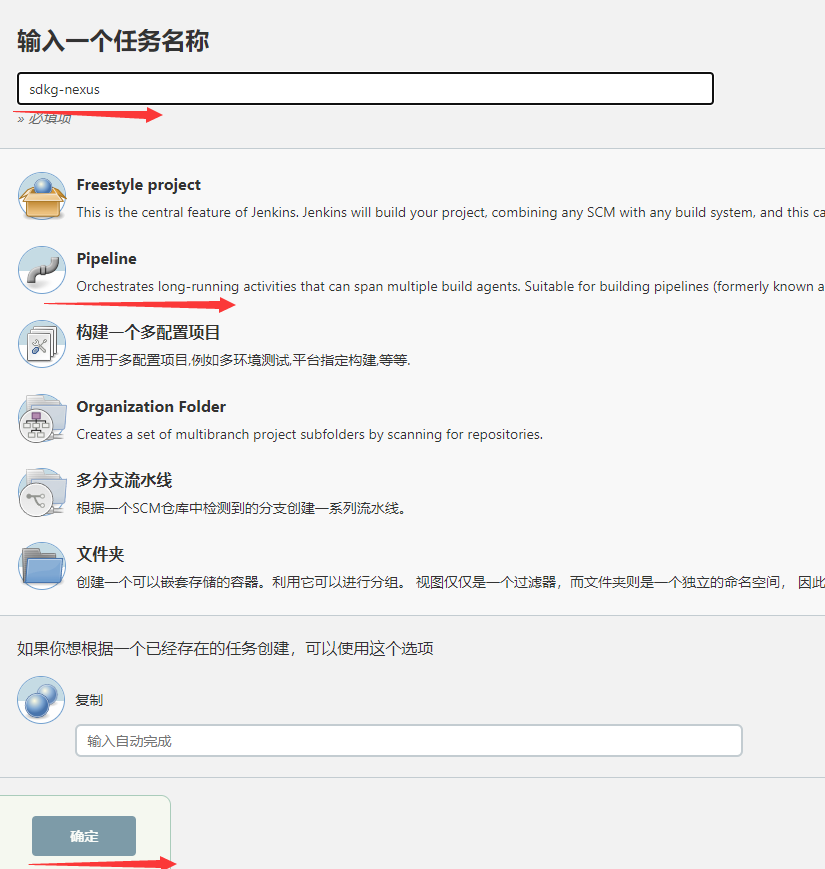
输入任务名称sdkg-nexus,选择Pipeline后,点“确定”按钮,进入配置任务页面

选择Pipeline script from SCM后,显示SCM下拉选择框如下
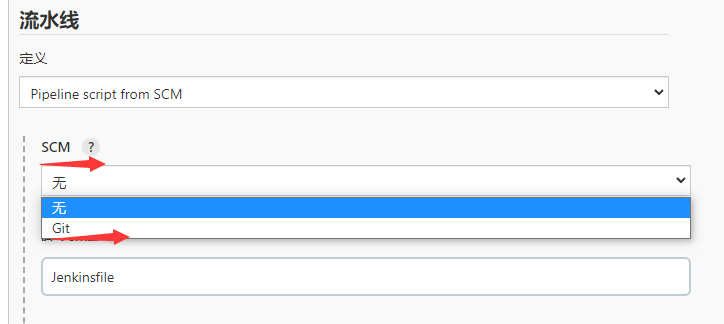
选择Git后,显示Repository标签和Repository URL输入框如下
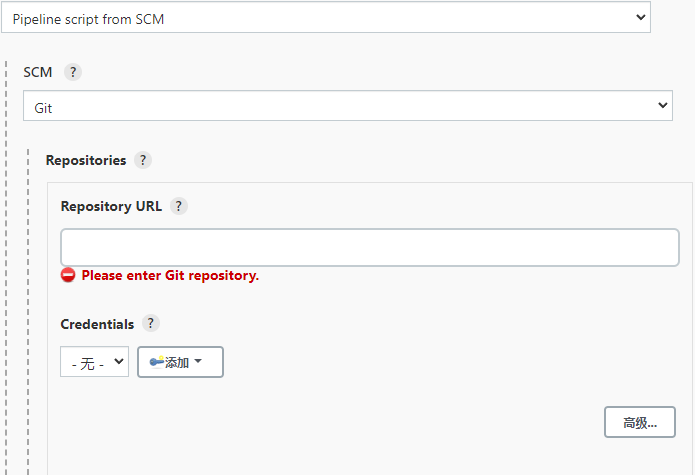
Repository URL输入https://gitee.com/fastjrun/sdkg.git

脚本路径输入deploy-nexus-gitee.groovy
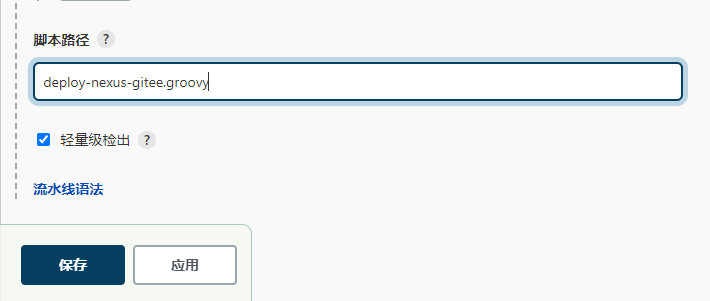
点“保存”按钮后,这个发布jar文件至Maven中央仓库的任务就配置好了
任务执行实践
以参考树莓派4B基于docker搭建devops平台首次部署的jenkins执行本任务,是不能完全成功执行本任务的,需要做一些配置才能通过jenkins将jar包发布至maven中央仓库。
这里我们将通过不断执行任务并解决遇到的问题直至成功的方式来完成本次实践。
1、首次执行报错“gpg: no default secret key: No secret key”
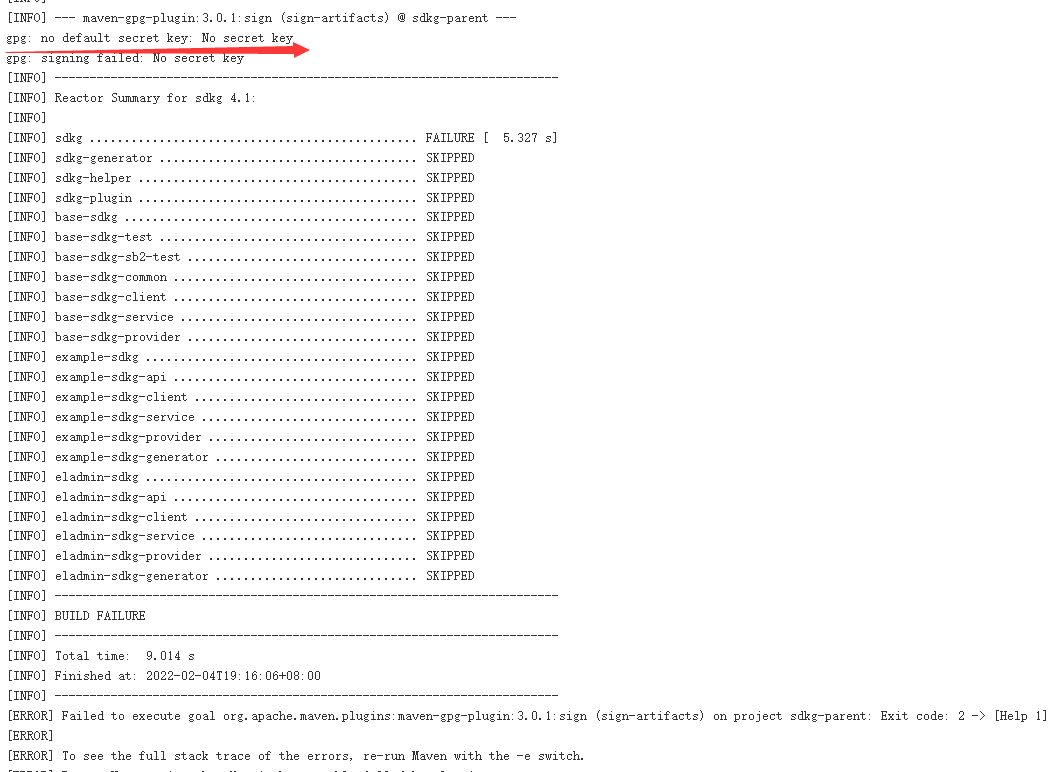
- 问题分析
该错误是因为没有找到对应的secret key,我们需要从别处导入secret key或者新建secret key并配置到settings.xml中。 - 处理方案及步骤
这里我们选择新建secret key,并配置到settings.xml中
1. 创建secret key并上传到服务器
## 进入容器
[root@pi155 ~]# docker exec -it jenkins bash
bash-4.2# gpg --gen-key
gpg (GnuPG) 2.0.22; Copyright (C) 2013 Free Software Foundation, Inc.
This is free software: you are free to change and redistribute it.
There is NO WARRANTY, to the extent permitted by law.

Please select what kind of key you want:
   (1) RSA and RSA (default)
   (2) DSA and Elgamal
   (3) DSA (sign only)
   (4) RSA (sign only)
Your selection? 4
RSA keys may be between 1024 and 4096 bits long.
What keysize do you want? (2048)
Requested keysize is 2048 bits
Please specify how long the key should be valid.
         0 = key does not expire
      <n>  = key expires in n days
      <n>w = key expires in n weeks
      <n>m = key expires in n months
      <n>y = key expires in n years
Key is valid for? (0)
Key does not expire at all
Is this correct? (y/N) y

GnuPG needs to construct a user ID to identify your key.

Real name: fastjrun
Email address: fastjrun@139.com
Comment: nexus
You selected this USER-ID:
    "fastjrun (nexus) <fastjrun@139.com>"

Change (N)ame, (C)omment, (E)mail or (O)kay/(Q)uit? O
You need a Passphrase to protect your secret key.

We need to generate a lot of random bytes. It is a good idea to perform
some other action (type on the keyboard, move the mouse, utilize the
disks) during the prime generation; this gives the random number
generator a better chance to gain enough entropy.
创建secret key过程中需要输入密码如下
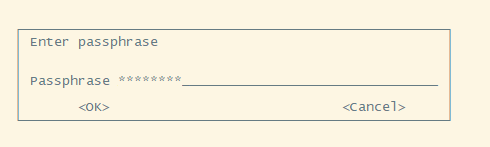
这里,我们会遇到问题2,请参考问题2进行处理。
创建secret key后,上传到服务器
bash-4.2# gpg --list-keys
/root/.gnupg/pubring.gpg
------------------------
pub   2048R/94DC8DA4 2022-02-04
uid                  fastjrun (nexus) <fastjrun@139.com>
## 上传到服务器
bash-4.2# gpg --keyserver hkp://keyserver.ubuntu.com:11371 --send-keys 94DC8DA4
gpg: sending key 94DC8DA4 to hkp server keyserver.ubuntu.com
## 立即查询会报找不到
bash-4.2# gpg --keyserver hkp://keyserver.ubuntu.com:11371 --recv-keys 94DC8DA4
gpg: requesting key 94DC8DA4 from hkp server keyserver.ubuntu.com
gpgkeys: key 94DC8DA4 not found on keyserver
gpg: no valid OpenPGP data found.
gpg: Total number processed: 0
## 过个几分钟查询才会有结果
bash-4.2# gpg --keyserver hkp://keyserver.ubuntu.com:11371 --recv-keys 94DC8DA4
gpg: requesting key 94DC8DA4 from hkp server keyserver.ubuntu.com
gpg: key 94DC8DA4: "fastjrun (nexus) <fastjrun@139.com>" not changed
gpg: Total number processed: 1
gpg:              unchanged: 1
2.创建secret key并上传到服务器
[root@pi155 ~]# cd /opt/server/jenkins/data/.m2
[root@pi155 .m2]# docker cp jenkins:/opt/maven/conf/settings.xml ./
修改settings.xml文件,主要修改内容如下:
<server>
	<id>sonatype-nexus-staging</id>
	<username>fastjrun</username>
	<password>MyPaswsord@1234</password>
</server>
<server>
	<id>sonatype-nexus-snapshots</id>
	<username>fastjrun</username>
	<password>MyPaswsord@1234</password>
</server>

<properties>
    <gpg.passphrase>MyPaswsord@1234</gpg.passphrase>
    <gpg.keyname>94DC8DA4</gpg.keyname>
  </properties>
2、首次创建secret key发现被卡住
在处理第一个问题的过程中,我们会遇到第二个问题,即当控制台显示
We need to generate a lot of random bytes. It is a good idea to perform
some other action (type on the keyboard, move the mouse, utilize the
disks) during the prime generation; this gives the random number
generator a better chance to gain enough entropy.
后一直卡在这里,等待很久都不能成功创建secret key。
- 问题分析 //TODO
该问题原因未知,直接上处理方案 - 处理方案及步骤
安装 rng-tools 这个工具,通过 yum install rng-tools完成安装。之后再执行命令:rngd -r /dev/urandom,再重新执行gpg --gen-key,则发现生成密钥可以瞬间完成了。
gpg: /root/.gnupg/trustdb.gpg: trustdb created
gpg: key 94DC8DA4 marked as ultimately trusted
public and secret key created and signed.

gpg: checking the trustdb
gpg: 3 marginal(s) needed, 1 complete(s) needed, PGP trust model
gpg: depth: 0  valid:   1  signed:   0  trust: 0-, 0q, 0n, 0m, 0f, 1u
pub   2048R/94DC8DA4 2022-02-04
      Key fingerprint = 2BF5 BA27 7795 2D8F 097D  8CEB C326 C0AA 94DC 8DA4
uid                  fastjrun (nexus) <fastjrun@139.com>

Note that this key cannot be used for encryption.  You may want to use
the command "--edit-key" to generate a subkey for this purpose.
2、再次执行通过
总结
参考树莓派4B基于docker搭建devops平台进行搭建的jenkins和sdkg项目已经解决了很多潜在问题,如果参考其他方案搭建的jenkins和准备可以发布jar文件至nexus中央仓库的项目过程中可能会遇到一些其他问题,您参考网上的解决方案自行处理即可,本实践将不再赘述。


评论区